Set Up a Custom Email Address with Google Workspace
The fine-print: This post contains affiliate links, which means that if you click on one of the product links and make a purchase I’ll receive a small commission at no additional expense to you. See the full affiliate disclosure in the footer for more info.
After you get your own web address (domain name) like we talked about in this blog post, you can create an email address that matches your domain (i.e. [email protected]). This looks super professional because it allows you to send and receive emails with an email address that matches your domain name instead of using a standard Gmail or Yahoo type email (i.e. [email protected]). Just like our email address [email protected] goes with this domain name.
If you haven’t done so already, check out the blog post about getting your own web address. After you have done that, follow these steps to create an email address with your new domain name using Google Workspace, then set up Gmail so you can send messages from your new email address.
These instructions show how to set this up with a domain name registered at GoDaddy which is the registrar we use and recommend. If your domain name is registered with a different company, the steps are similar but could be slightly different where indicated in the instructions.
You may also want to consider transferring your domain to GoDaddy. GoDaddy offers great prices, many different extensions and they also include domain privacy for free which keeps your contact info private in the WHOIS database. Most registrars charge extra for domain privacy so you’ll save money!
Ready to set up that branded email address that matches your domain name?? Let’s get started!
STEP 1 – Google Workspace: Getting Started
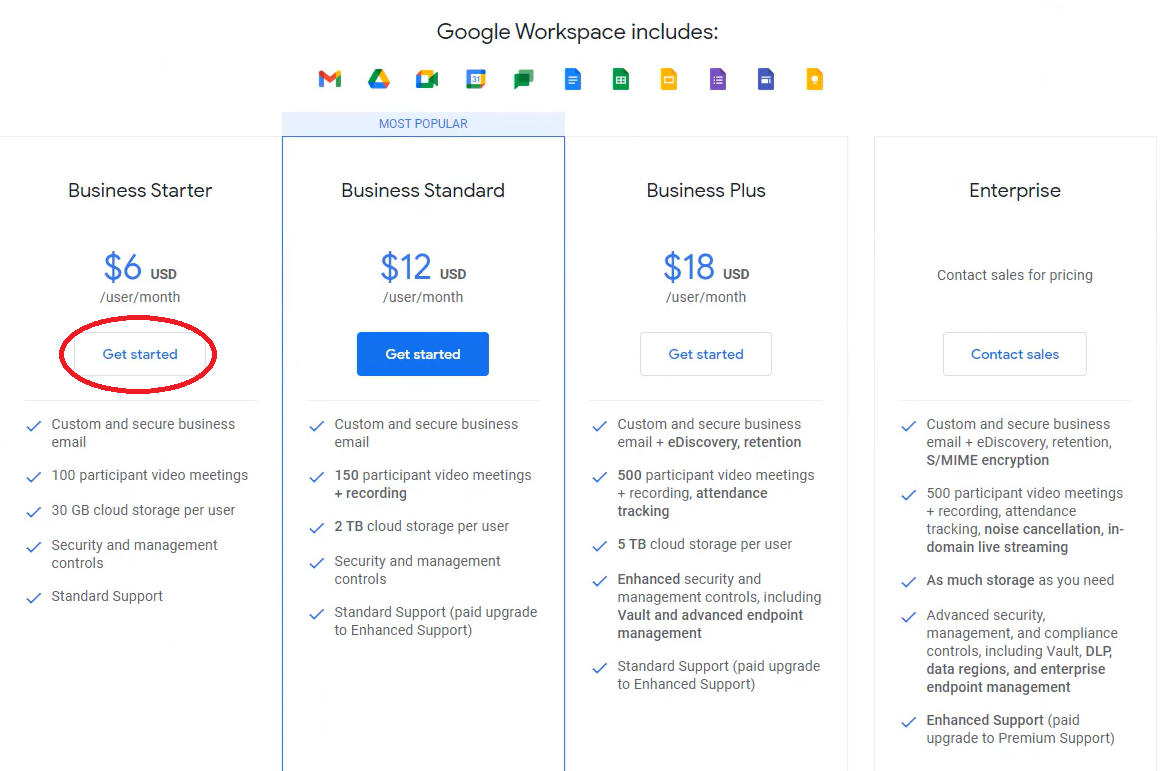
Head over to Google Workspace. Under the Business Starter column, click the “GET STARTED” button.
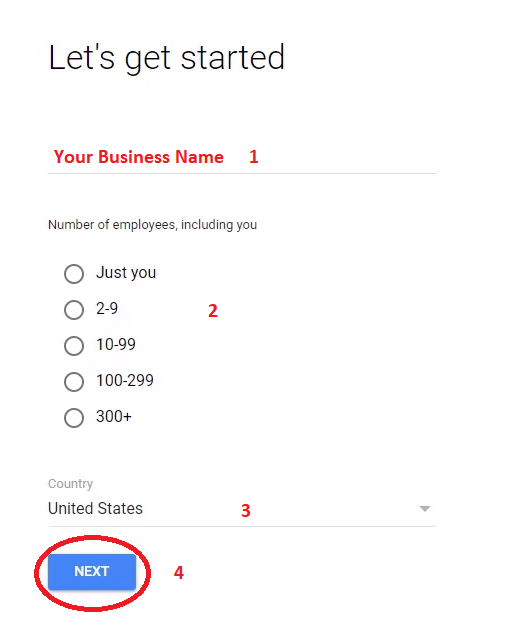
STEP 2 – Google Workspace: Fill Out the Getting Started Form
- Fill in your business name.
- Click the button that corresponds to your number of employees.
- Select your country.
- Click the “NEXT” button.
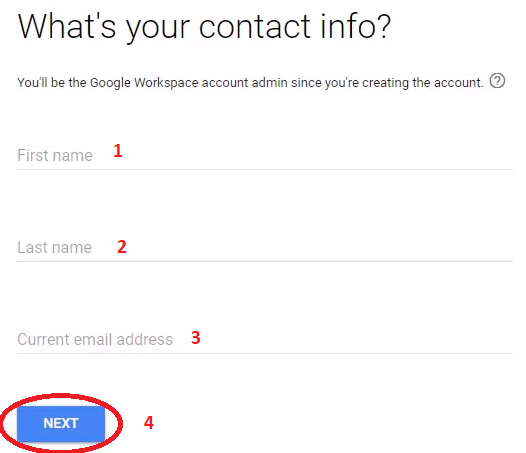
STEP 3 – Google Workspace: Enter Your Contact Information
- Fill in your first name.
- Fill in your last name.
- Fill in your current email address.
- Click the “NEXT” button.
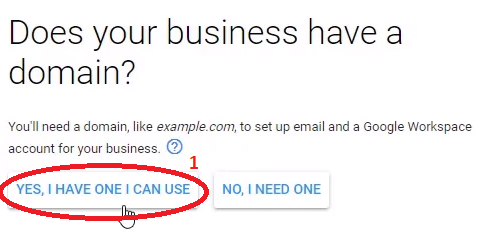
STEP 4 – Google Workspace: Verify That Your Business Has a Domain
- Click the “YES, I HAVE ONE I CAN USE” button.
STEP 5 – Google Workspace: Enter Your Domain
- Fill in your domain name.
- Click the “NEXT” button.
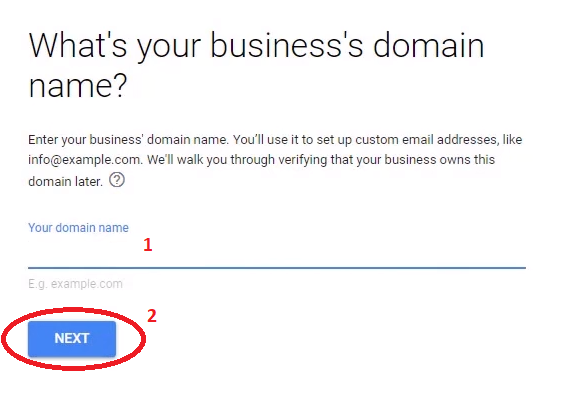
STEP 6 – Google Workspace: Verify the Domain You Want to Use
If the domain that you are using to setup the account is correctly displayed, click the “NEXT” button.
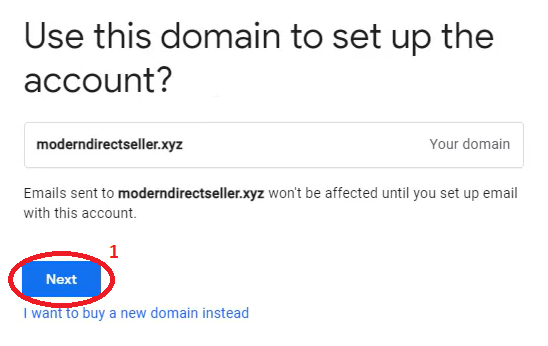
STEP 7 – Google Workspace: Educate Your Users
For this step, the choice is yours. If you were to add new users to your Google Workspace and you want them to receive educational emails about the things that you can do with Google Workspace, click “OK”. If you are the only user in your Google Workspace or if you would rather not have new users receive these emails, click “NO THANKS”.
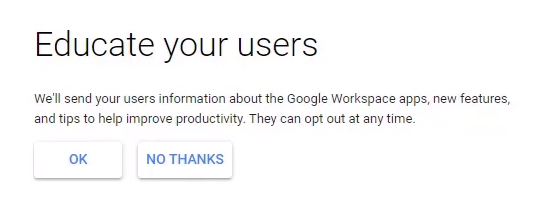
STEP 8 – Google Workspace: Create Your Username and Password
- Fill in your desired username (typically your first name but can be anything you want).
- Create a new password and fill it in.
- Click the reCAPTCHA box.
- Click the “AGREE AND CONTINUE” button.
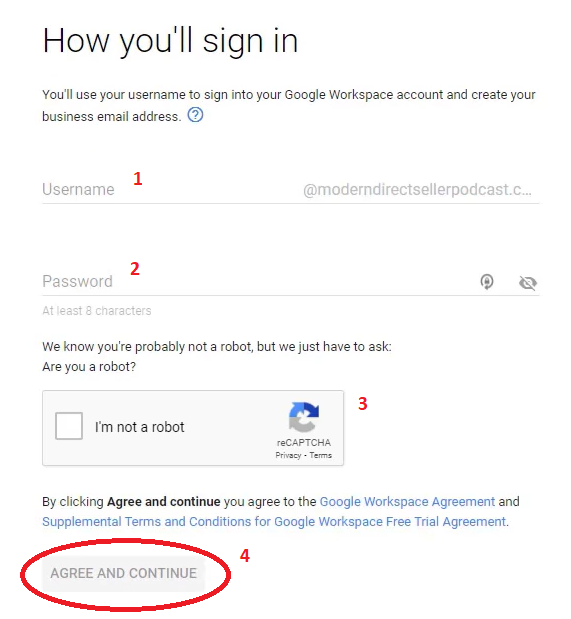
STEP 9 – Google Workspace: Sign in to Your New Account
- Enter your newly created email.
- Click the “NEXT” button.
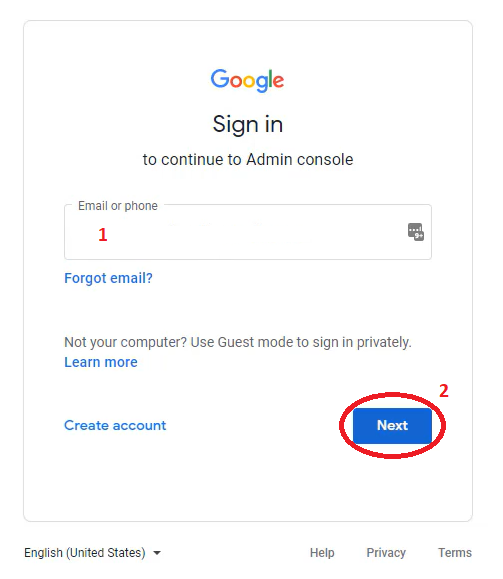
STEP 10 – Google Workspace: Sign in to Your New Account
- Enter your password.
- Click the “NEXT” button.
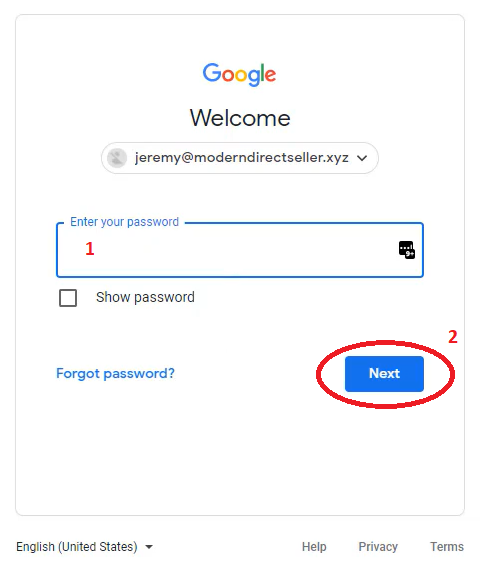
STEP 11 – Google Workspace: Sign in to Your New Account
Google will ask for your phone number to verify your identity and protect your account security.
- Enter your phone number.
- Keep the Text message option selected and click the “GET CODE” button.
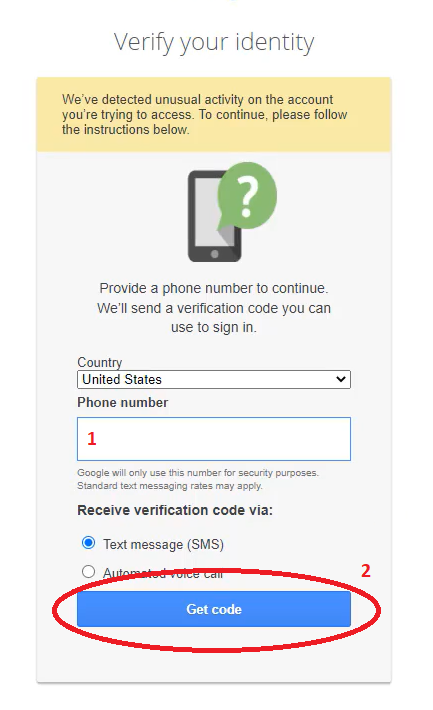
STEP 12 – Google Workspace: Sign in to Your New Account
After providing your phone number, Google will send you a text message with a one-time verification code.
- Enter the verification code that was sent to your phone.
- Click the “VERIFY” button.
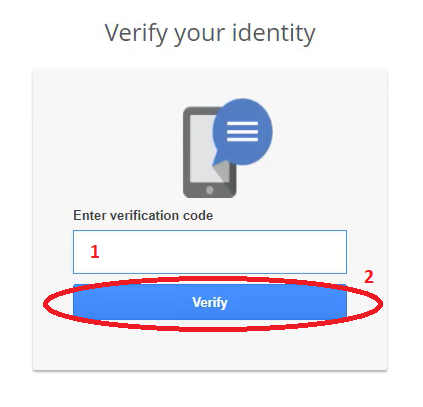
STEP 13 – Google Workspace: Terms of Service
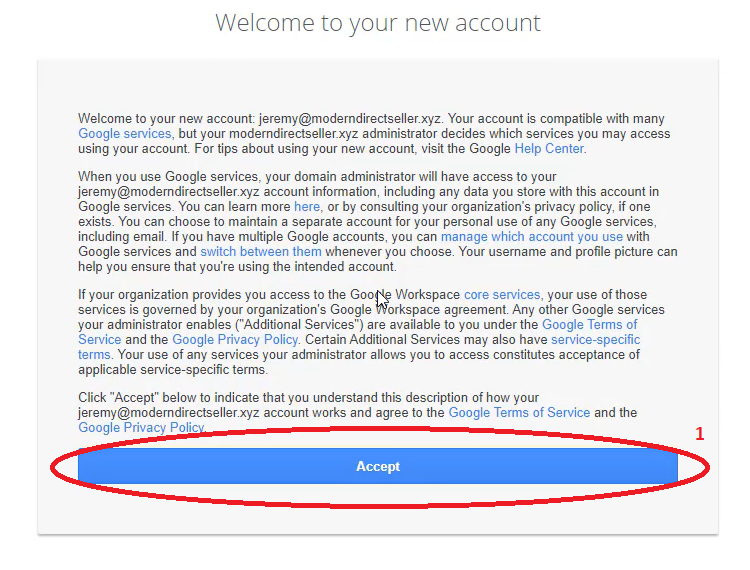
Read through the Terms of Service and then click the “ACCEPT” button.
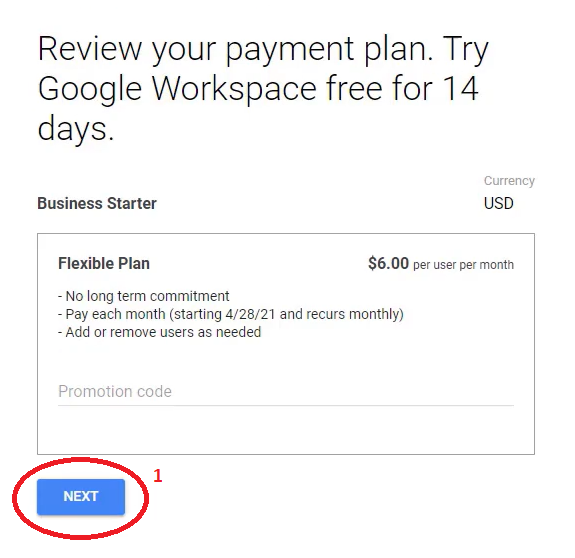
STEP 14 – Google Workspace: Review Payment Plan
Verify that the correct plan is selected and click the “NEXT” button.
STEP 15 – Google Workspace: Review and Check Out
- Fill in your name and address.
- Fill in your payment details.
- Click the “NEXT” button.

STEP 16 – Google Workspace: Account Created
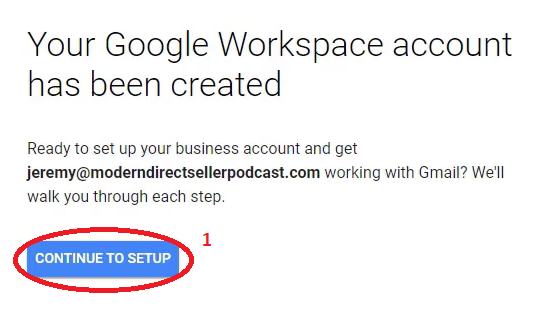
Your account has been successfully created. Click the “CONTINUE TO SETUP” button.
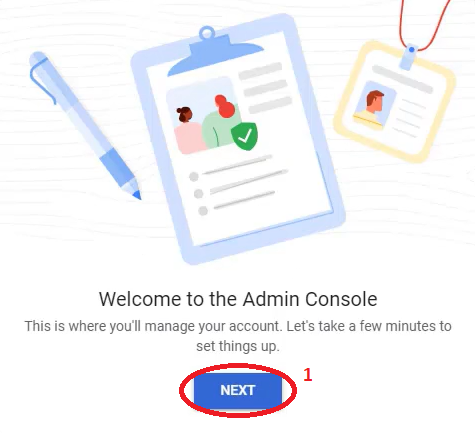
STEP 17 – Google Workspace: Admin Console
Click the “NEXT” button.
STEP 18 – Google Workspace: Activate Gmail
The first thing we want to setup in the Admin Console is Gmail. To get this started, click the “ACTIVATE” button.
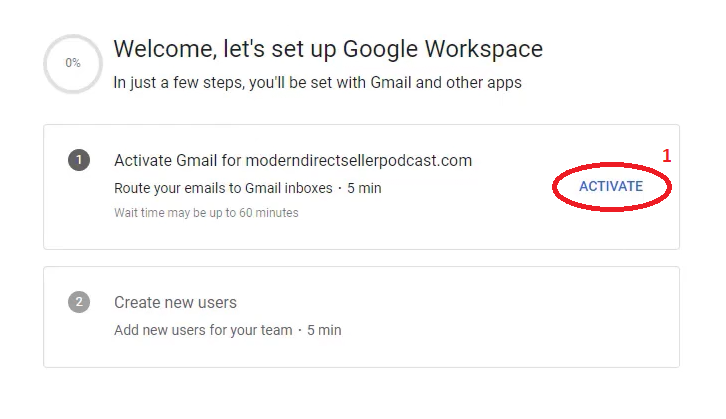
STEP 19 – Google Workspace: Activate Gmail
Google should automatically detect your domain registrar. In our example, our registrar is GoDaddy. This step may look slightly different if you are using a different domain registrar. Google correctly identifies our registrar so, click the “SIGN IN TO ACTIVATE” button.
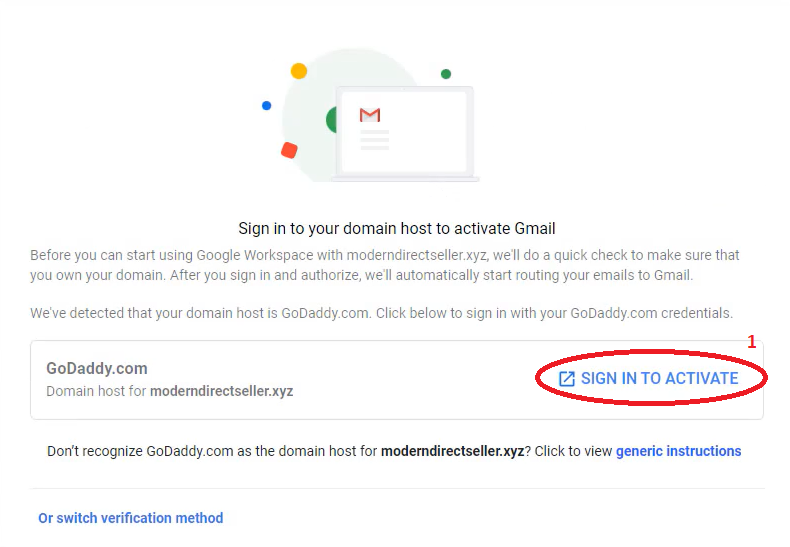
STEP 20 – Google Workspace: Activate Gmail
- Enter your GoDaddy username.
- Enter your GoDaddy password.
- Click the “SIGN IN” button.
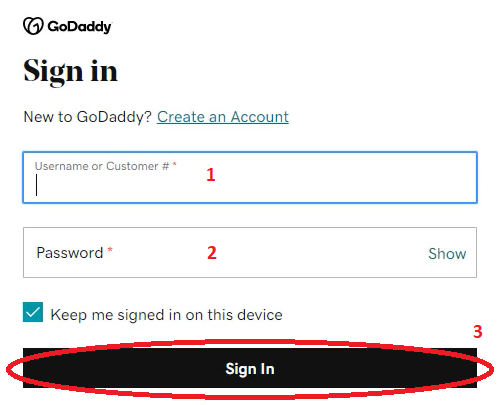
STEP 21 – Google Workspace: Connect GoDaddy
Click the “CONNECT” button.
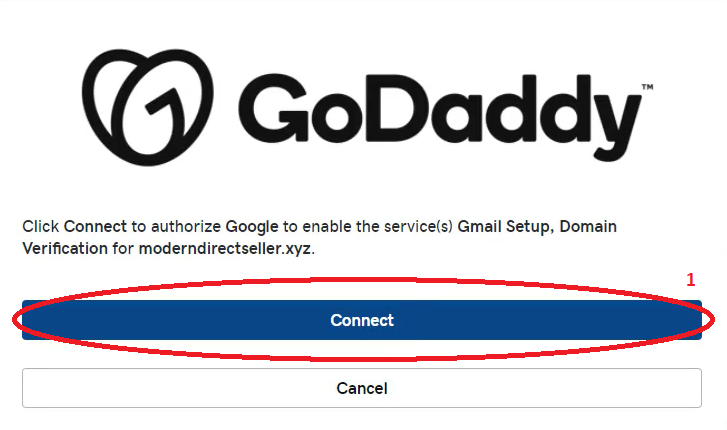
STEP 22 – Google Workspace: Connect GoDaddy
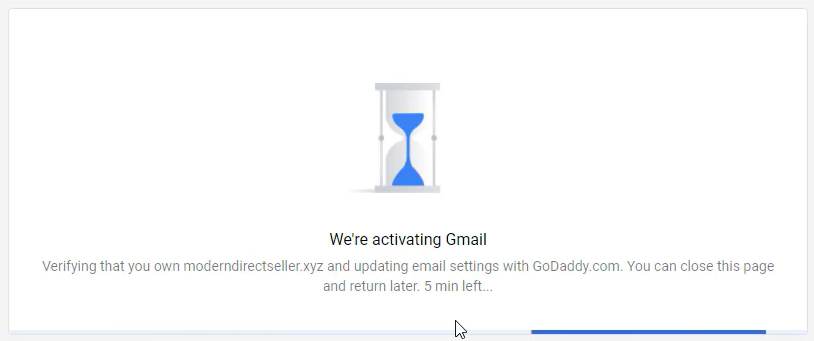
After entering your GoDaddy credentials, wait for a moment as Google automatically activates Gmail.
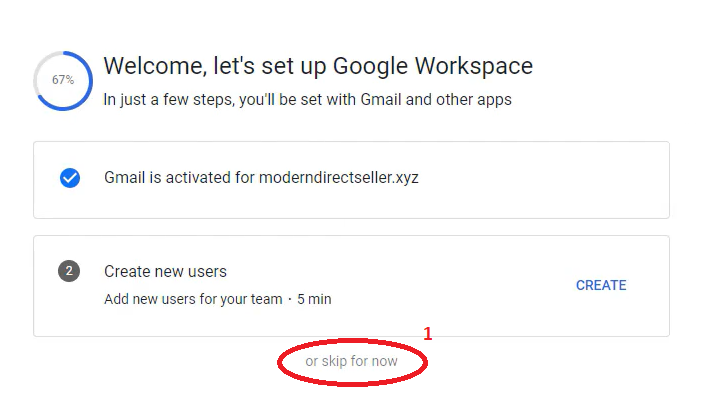
STEP 23 – Google Workspace: Create New Users
At this point, you have the option to add new users to your Google Workspace. If you don’t need to add new users or wish to do this later, click the “SKIP FOR NOW” button.
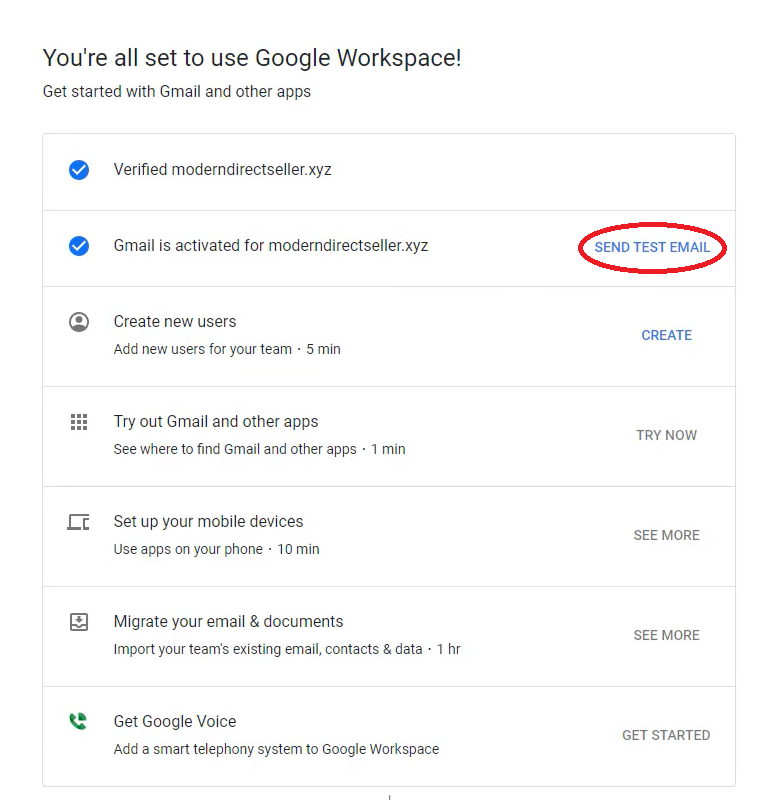
STEP 24 – Google Workspace: Send Test Email
Now that Gmail has been activated, we want to send a test email to verify that it is working properly. To do so, click the “SEND TEST EMAIL” button.
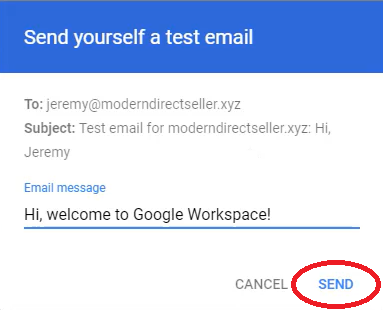
STEP 25 – Google Workspace: Send Test Email
Click the “SEND” button.
STEP 26 – Google Workspace: Verify Test Email
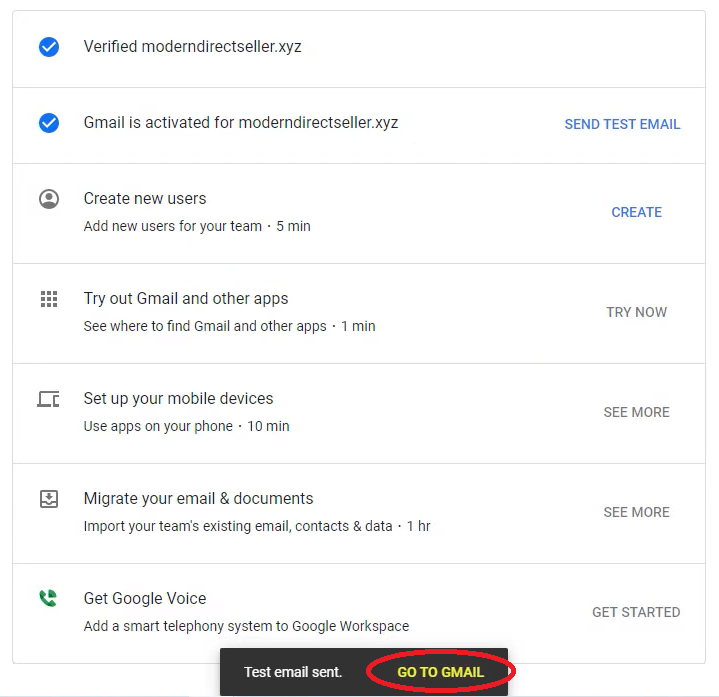
At the bottom of your screen, you should see confirmation that the test email was sent. Click the “GO TO GMAIL” button.
STEP 27 – Gmail: Verify Test Email
A new tab should have opened to your Gmail inbox. Verify that the test email is present in your inbox.

STEP 28 – Google Workspace: Alternate Email Address
Alternate email addresses are a great way to make your business look more professional (i.e [email protected]). These next few steps will walk you through how to create one for your new Google Workspace account.
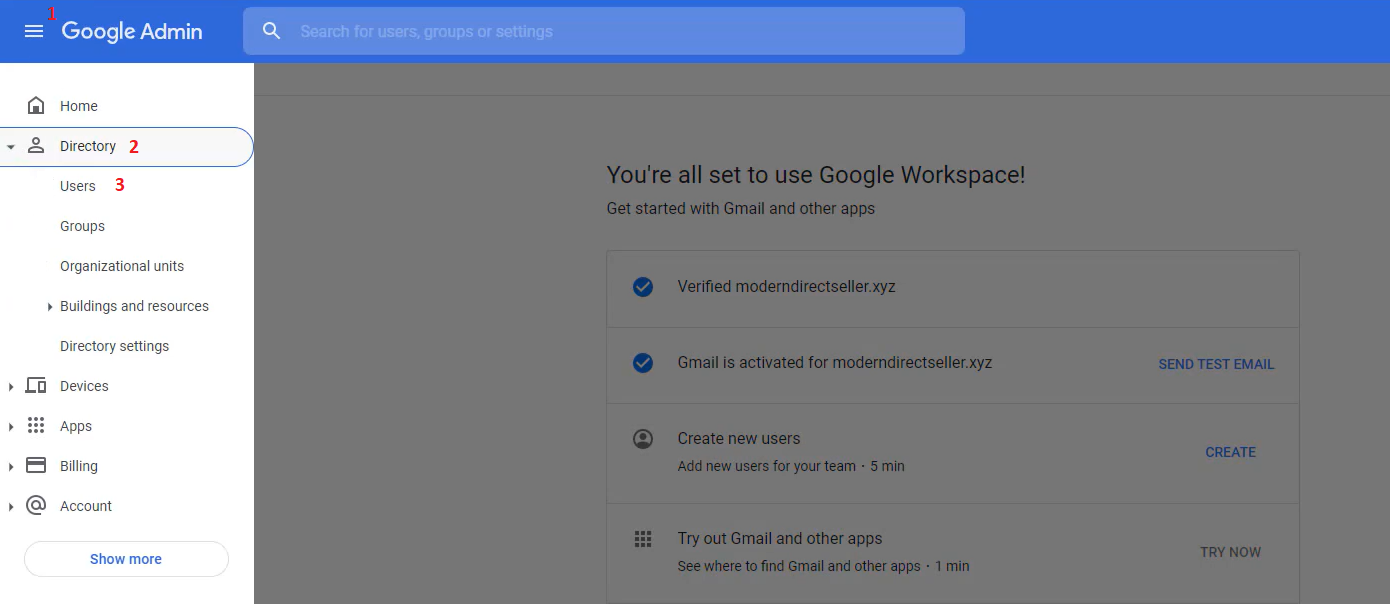
- Click on “GOOGLE ADMIN” to bring up the menu.
- Click the “DIRECTORY” button.
- Click the “USERS” button.
STEP 29 – Google Workspace: Alternate Email
Click on your name in the Users menu.

STEP 30 – Google Workspace: Alternate Email
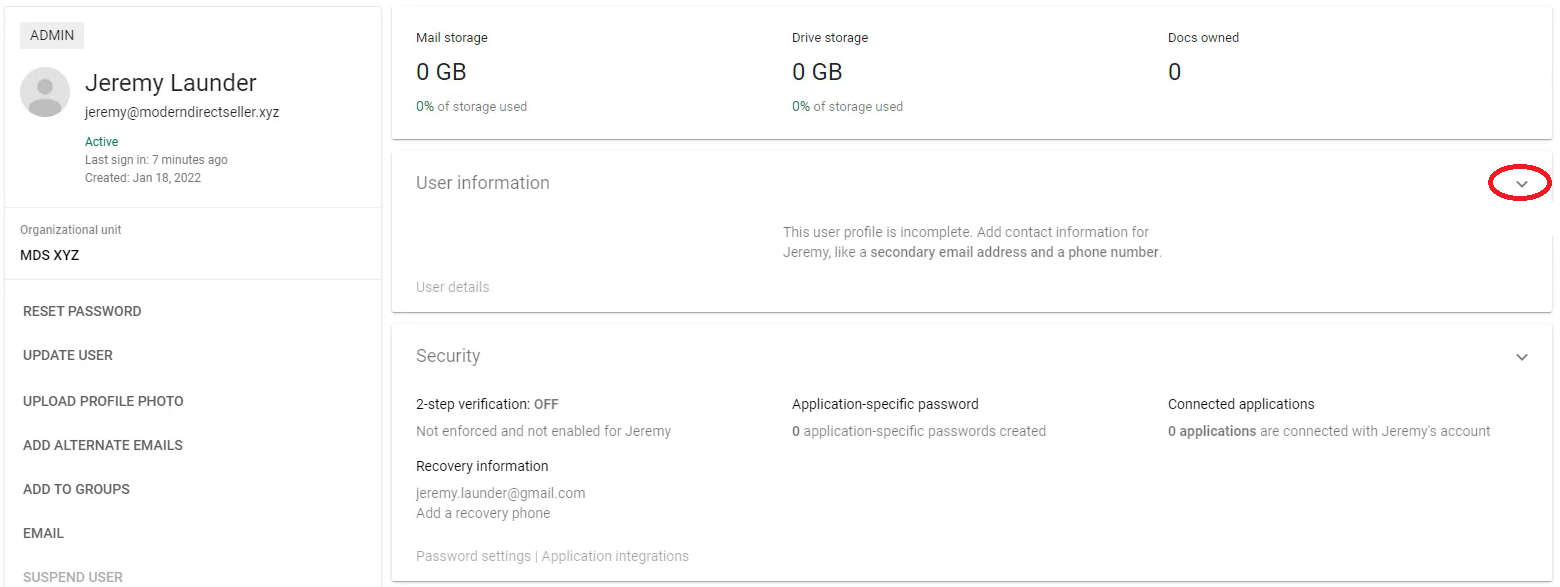
Click on the down arrow in the User information section.
STEP 31 – Google Workspace: Alternate Email
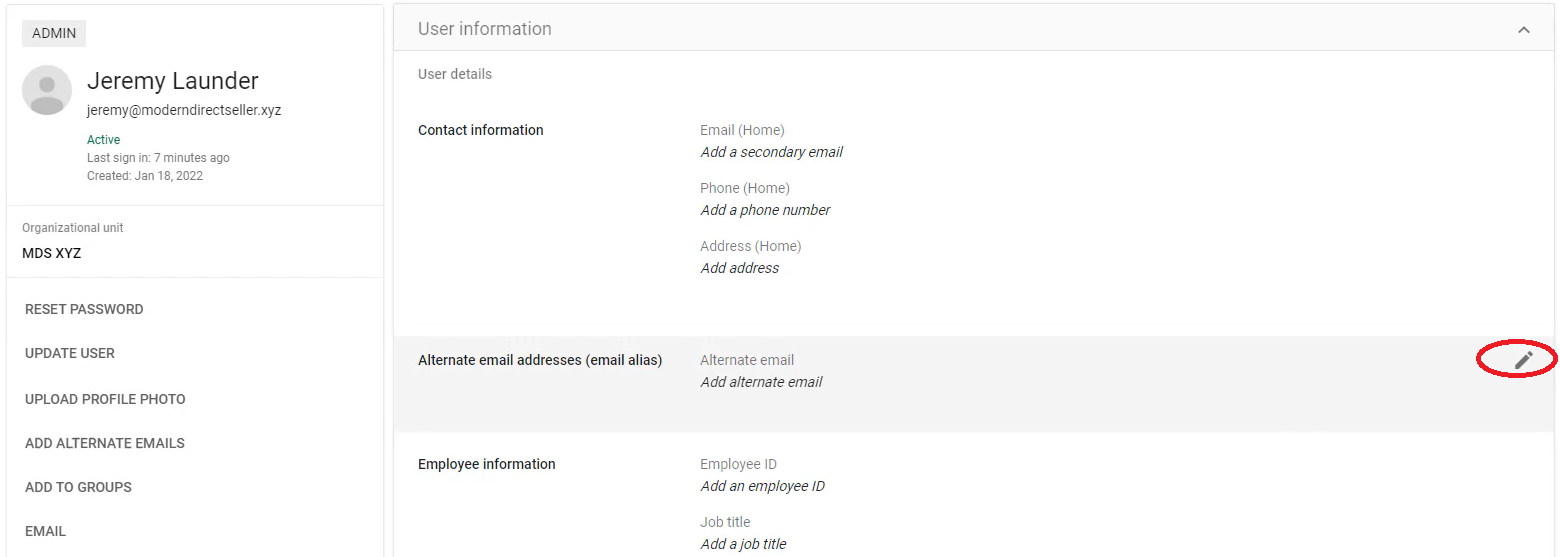
Click on the pencil icon in the Alternate email addresses section.
STEP 32 – Google Workspace: Alternate Email
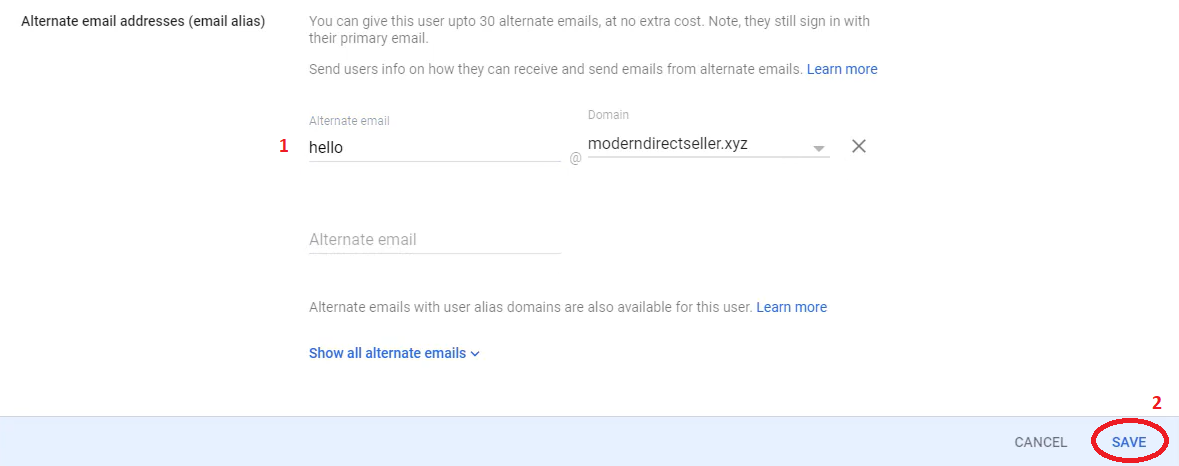
- Type in “hello” or any other alternate email address you would like to use.
- Click the “SAVE” button.
STEP 33 – Gmail: Alternate Email
Head back over to your Gmail tab.
- Click on the Settings icon
- Click on the “SEE ALL SETTINGS” button.

STEP 34 – Gmail: Alternate Email
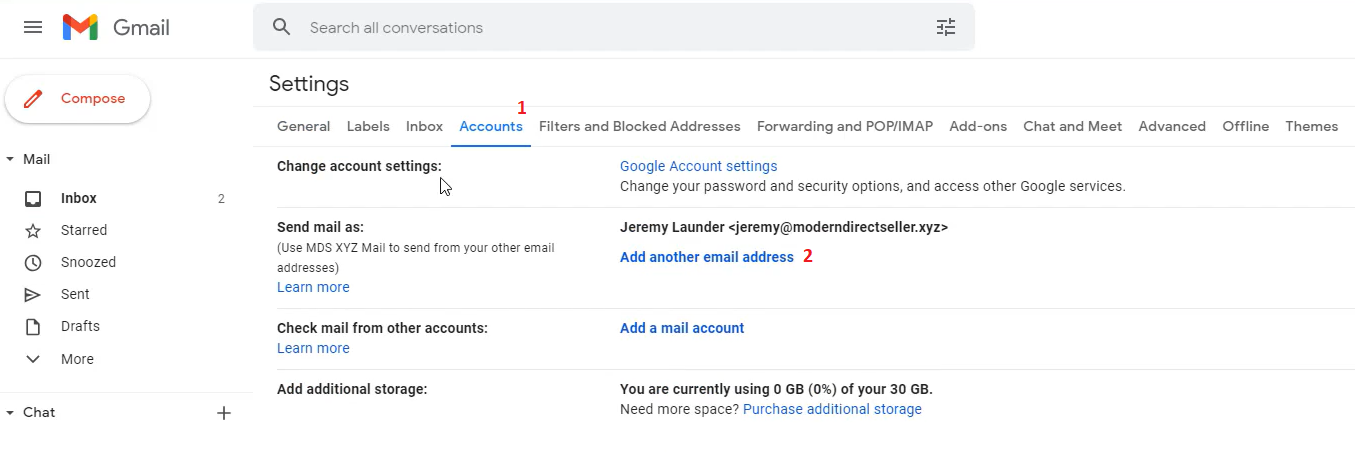
- Click on the “ACCOUNTS” button.
- Click on “ADD ANOTHER EMAIL ADDRESS”.
STEP 35 – Gmail: Alternate Email
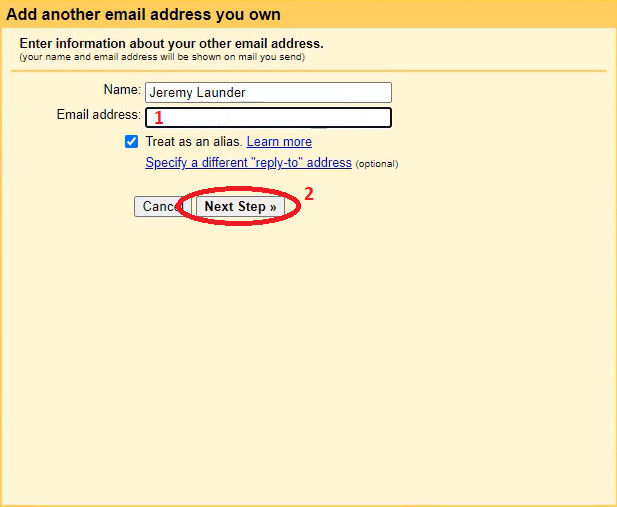
- Type in the alternate email address that you just created. For this example, it is: “[email protected]”
- Leave “Treat as an alias” checked and click the “NEXT STEP” button.
STEP 36 – Gmail: Alternate Email
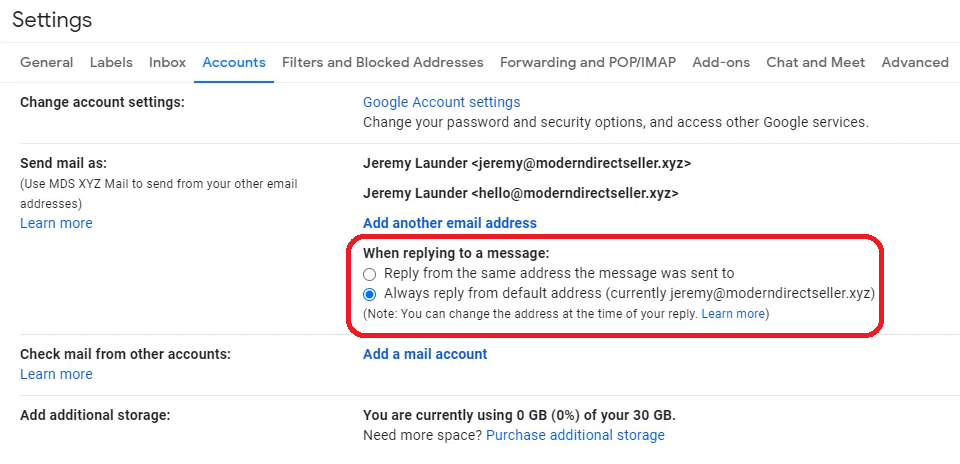
For this step, you will need to decide which email address you want your messages to be sent from when replying to a message. There are two options:
- The first option is “Reply from the same address the message was sent to.” With this option, if an email is sent to your alternate email address, the reply will be sent from the alternate email address as well.
- The second option is “Always reply from the default address.” With this option, even if an email is sent to your alternate email address, your reply will be sent from your default address.
STEP 37 – Gmail: Alternate Email
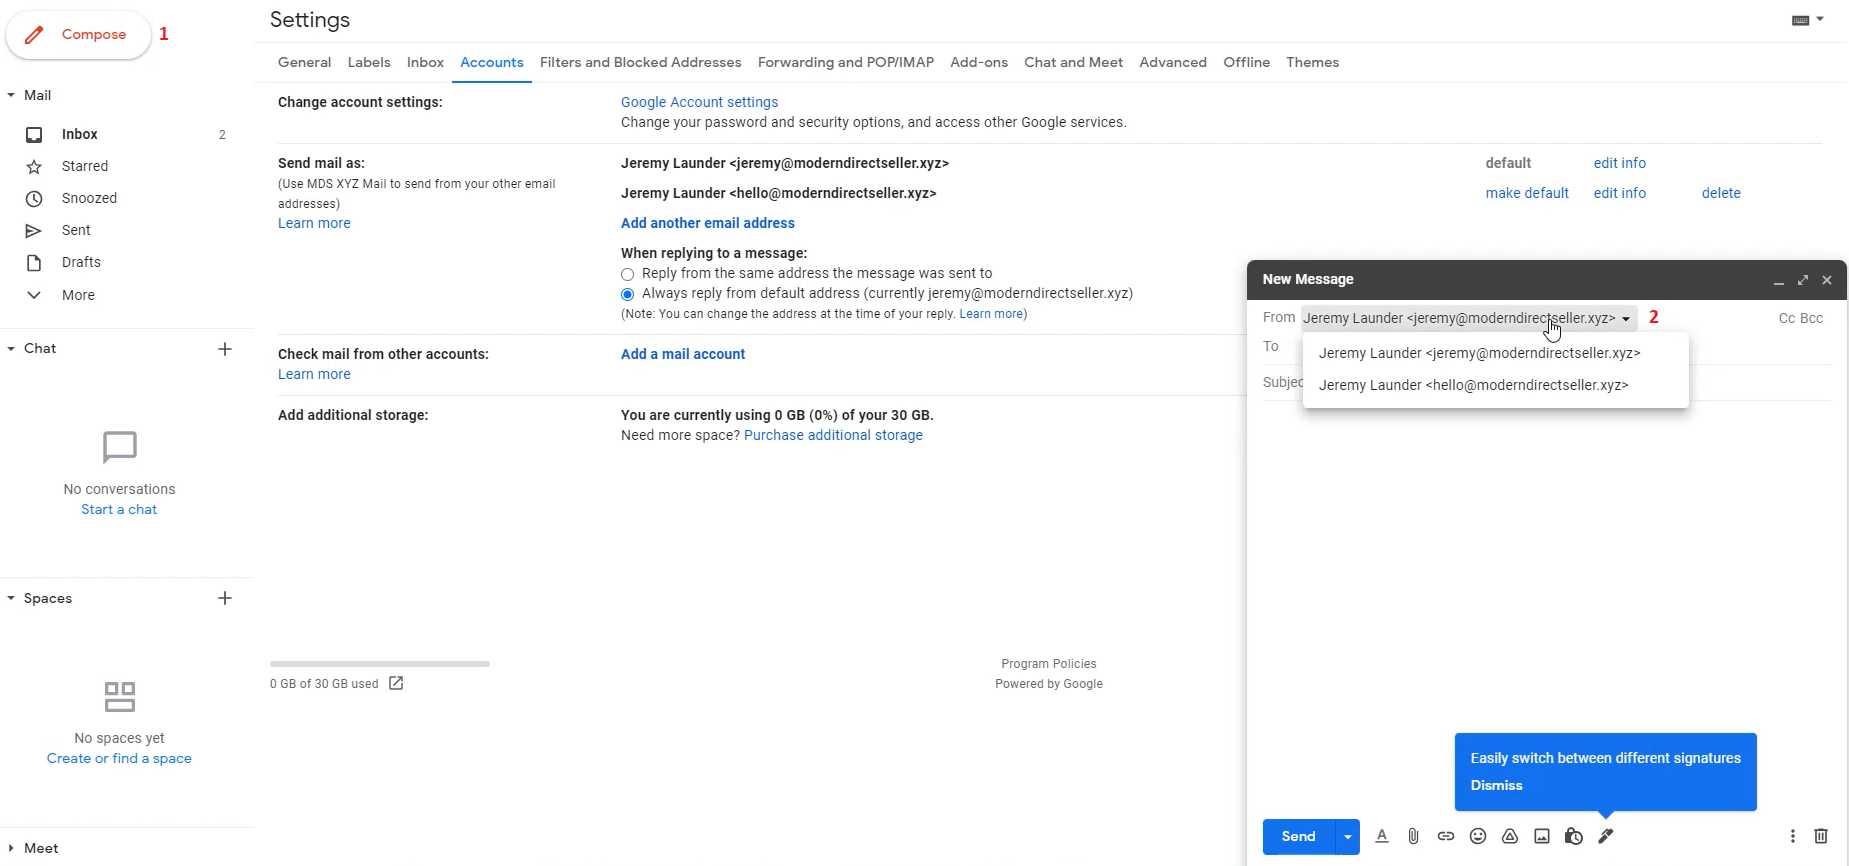
Now we want to confirm that our new alternate email address is working correctly.
- Click the “COMPOSE” button.
- Click on your email address in the “From” section of the New Message window and you should see your newly created alternate email address.
STEP 38 – Google Workspace: Authenticate Email
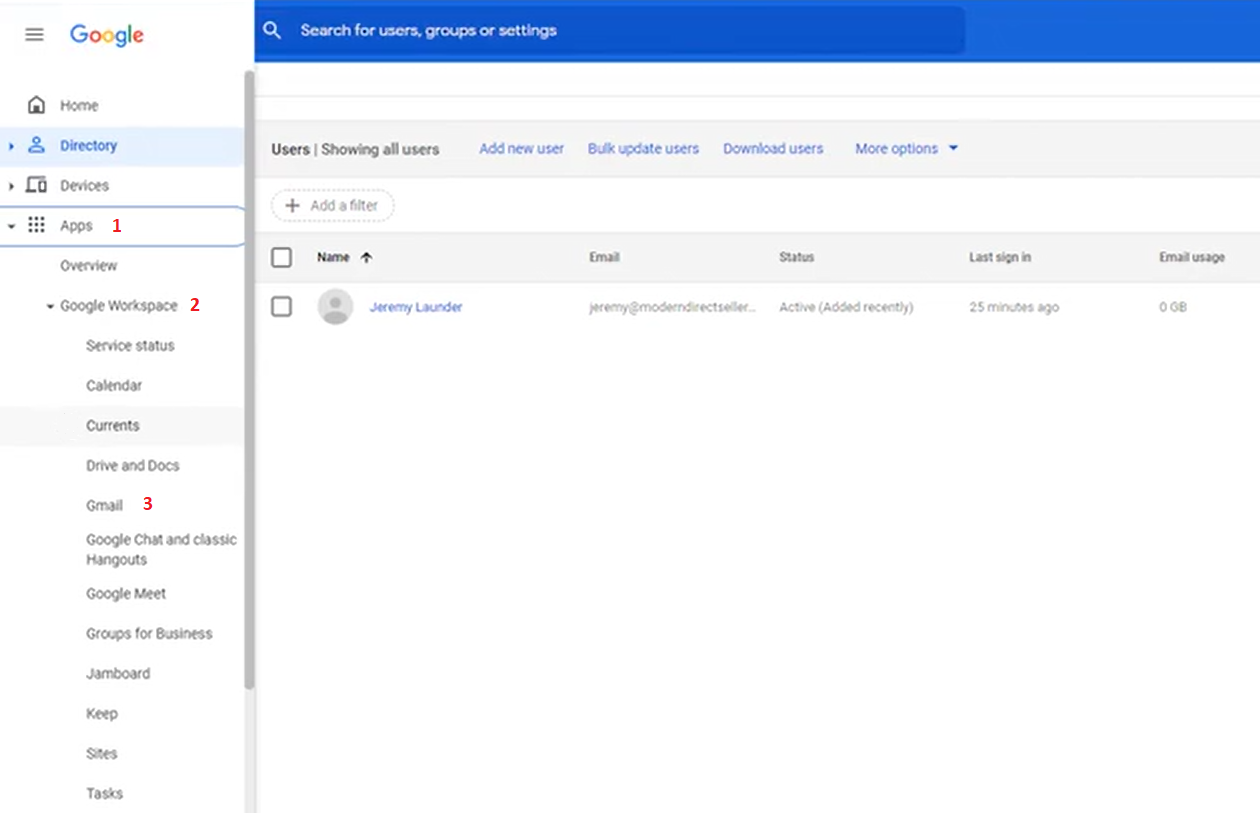
Email authentication prevents spoofing and helps your emails land in your customer’s inbox.
- In the Google Admin menu, click on “APPS”
- Click on “GOOGLE WORKSPACE”
- Click on “GMAIL”
STEP 39 – Google Workspace: Authenticate Email
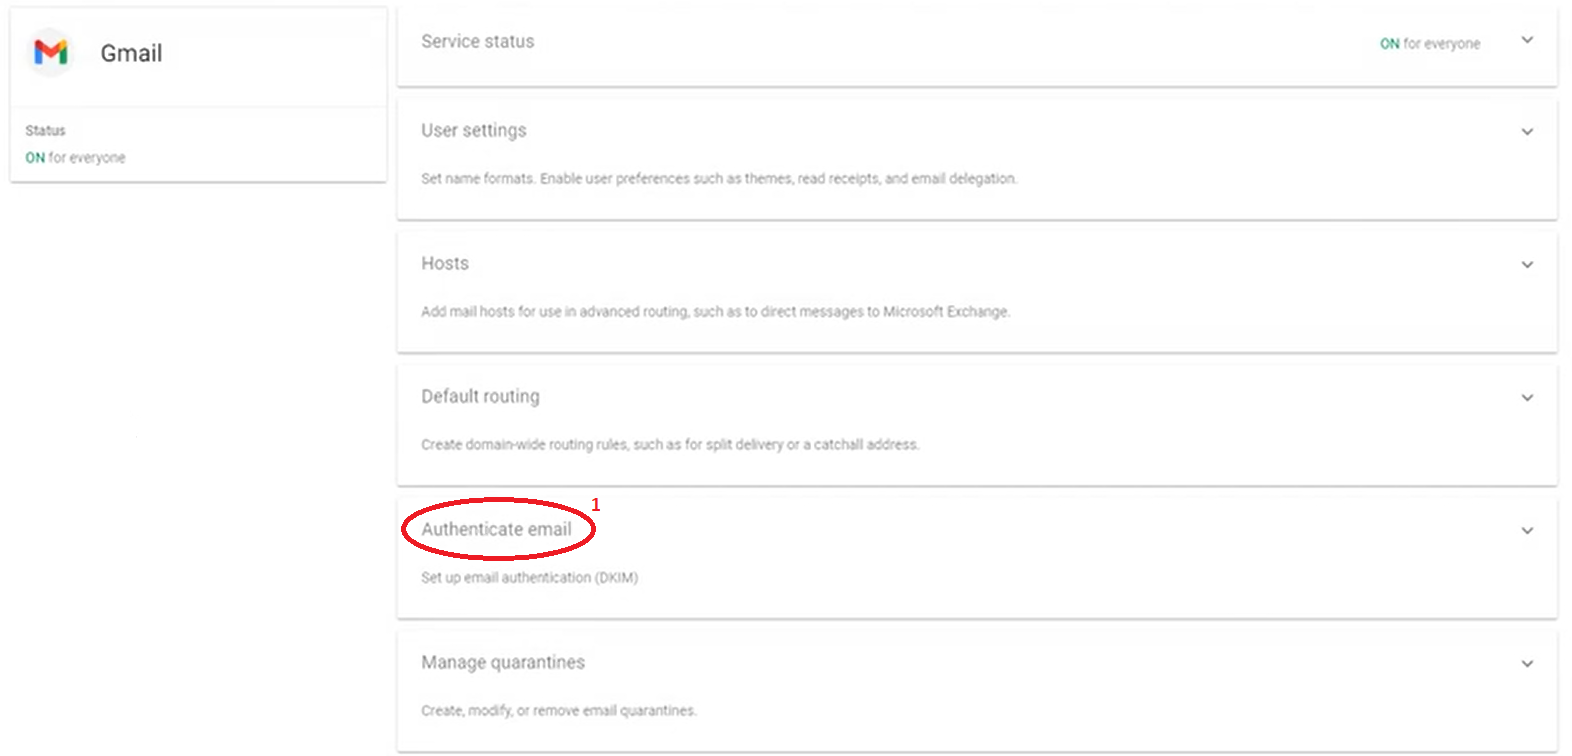
Click on the “AUTHENTICATE EMAIL” button.
STEP 40 – Google Workspace: Authenticate Email
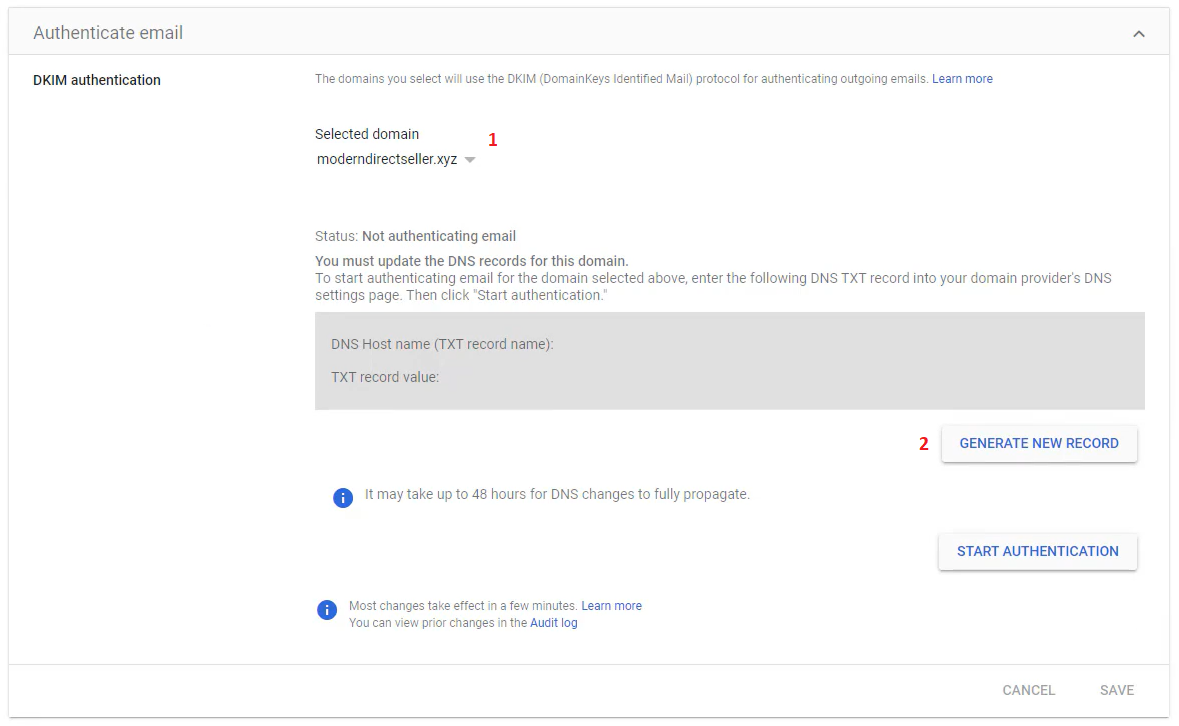
Note: You may not be able to generate this record immediately after setting up your Google Workspace account. You may need to wait 24-48 hours.
- Ensure that your correct domain is selected.
- Click the “GENERATE NEW RECORD” button.
STEP 41 – Google Workspace: Authenticate Email
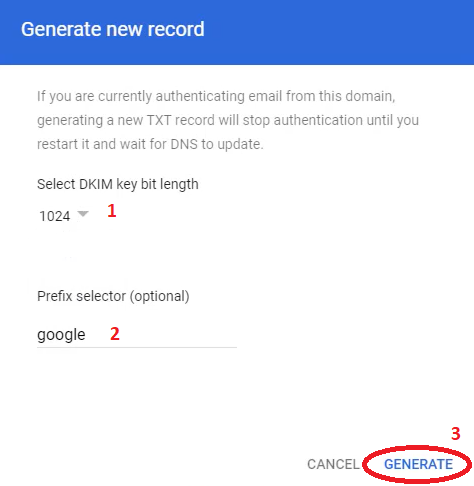
- Select “1024” as the DKIM key bit length.
- Keep “google” as the Prefix selector.
- Click the “GENERATE” button.
STEP 42 – Google Workspace: Authenticate Email
If you receive this “DKIM authentication settings update failed” message, your account is too new to create this record. You can try again periodically or come back after 24-48 hours to complete this step.
STEP 43 – Google Workspace: Authenticate Email
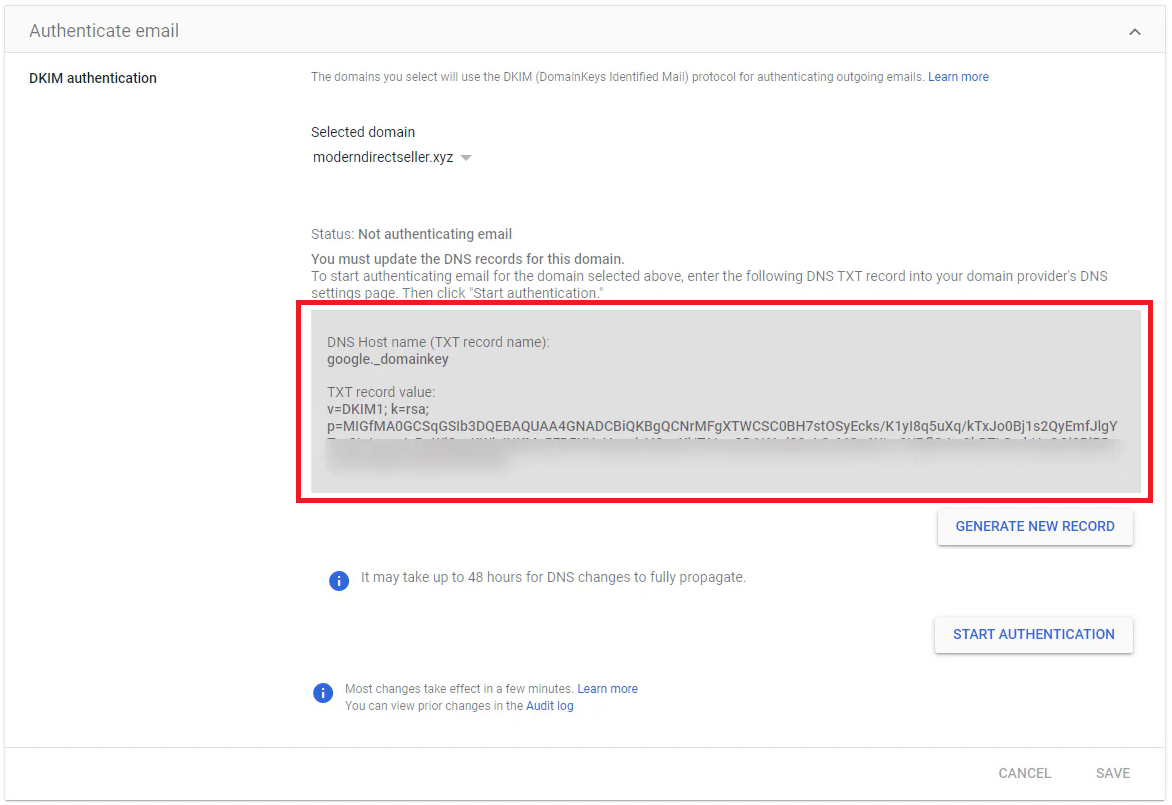
When your key is successfully created, it will look something like this. We need to add this key to our domain registrar. I will be showing this step using GoDaddy. If you are using a different registrar, this step will look different.
STEP 44 – GoDaddy: Authenticate Email
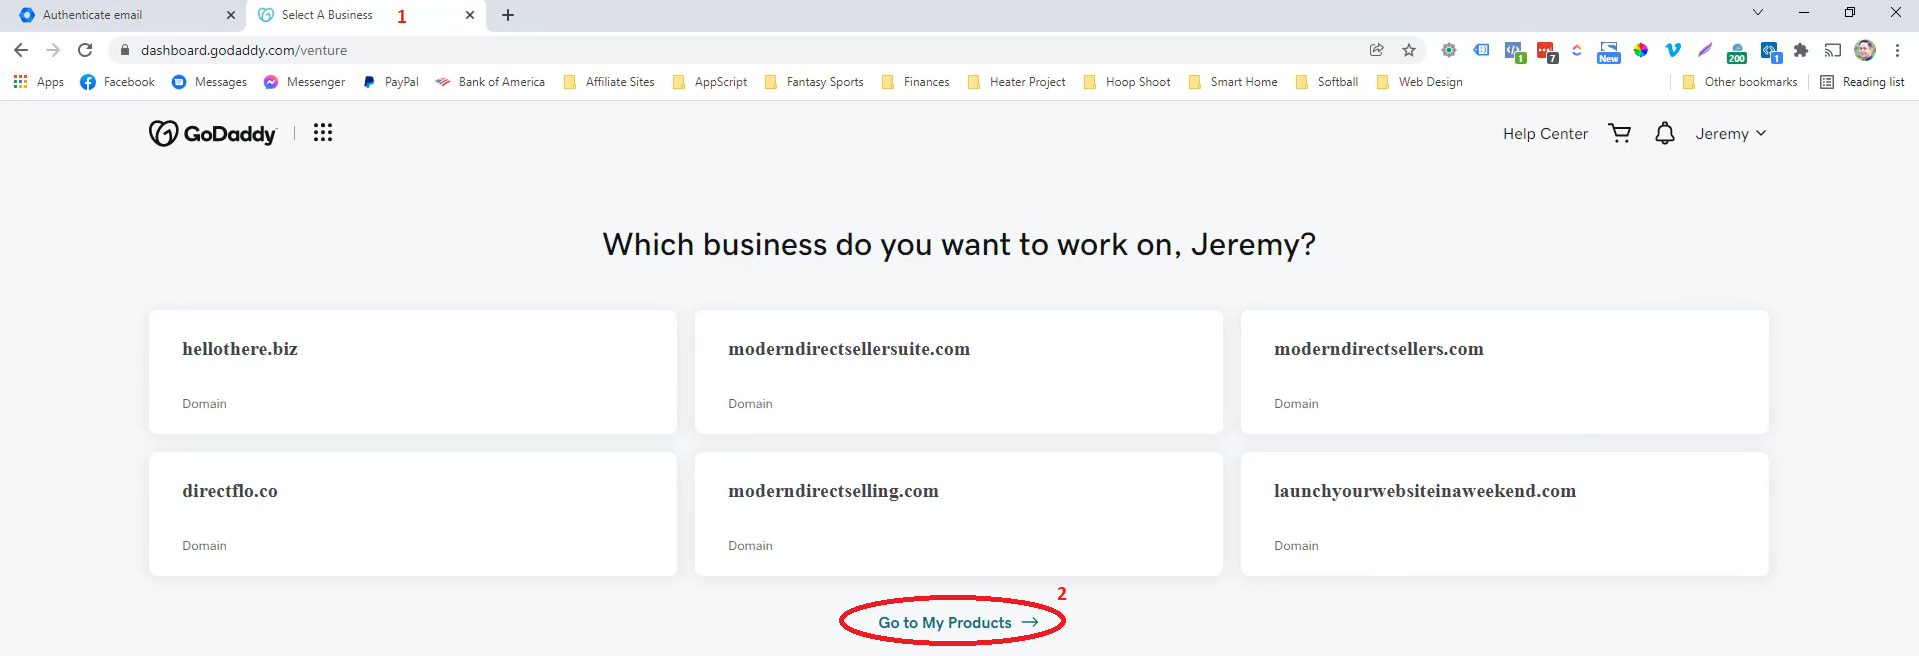
- In a new tab, sign in to your GoDaddy account.
- Click the “GO TO MY PRODUCTS” button.
STEP 45 – GoDaddy: Authenticate Email
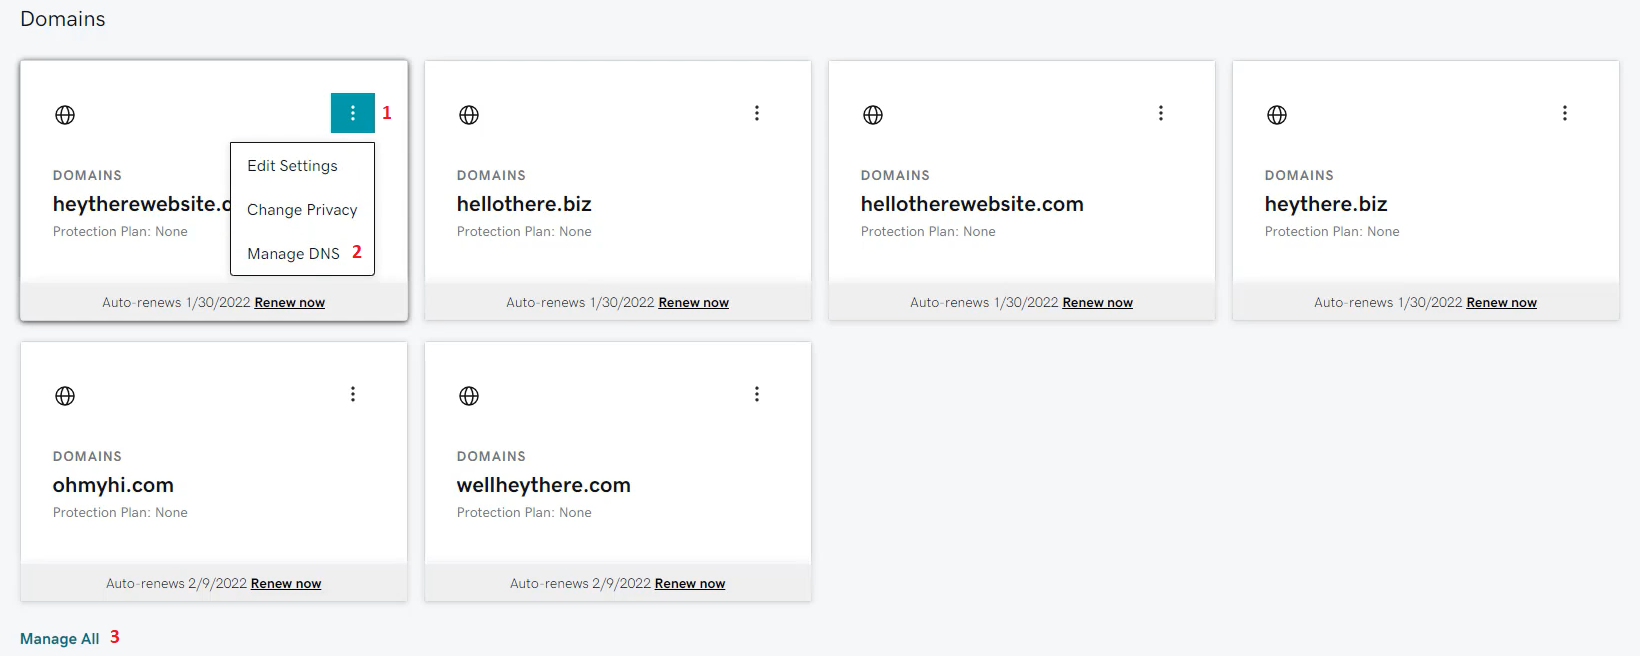
- Click the three dots next to your domain name.
- Click the “MANAGE DNS” button.
- If necessary, click the “MANAGE ALL” button to bring up a list of all of your domains to find the correct domain.
STEP 46 – GoDaddy: Authenticate Email
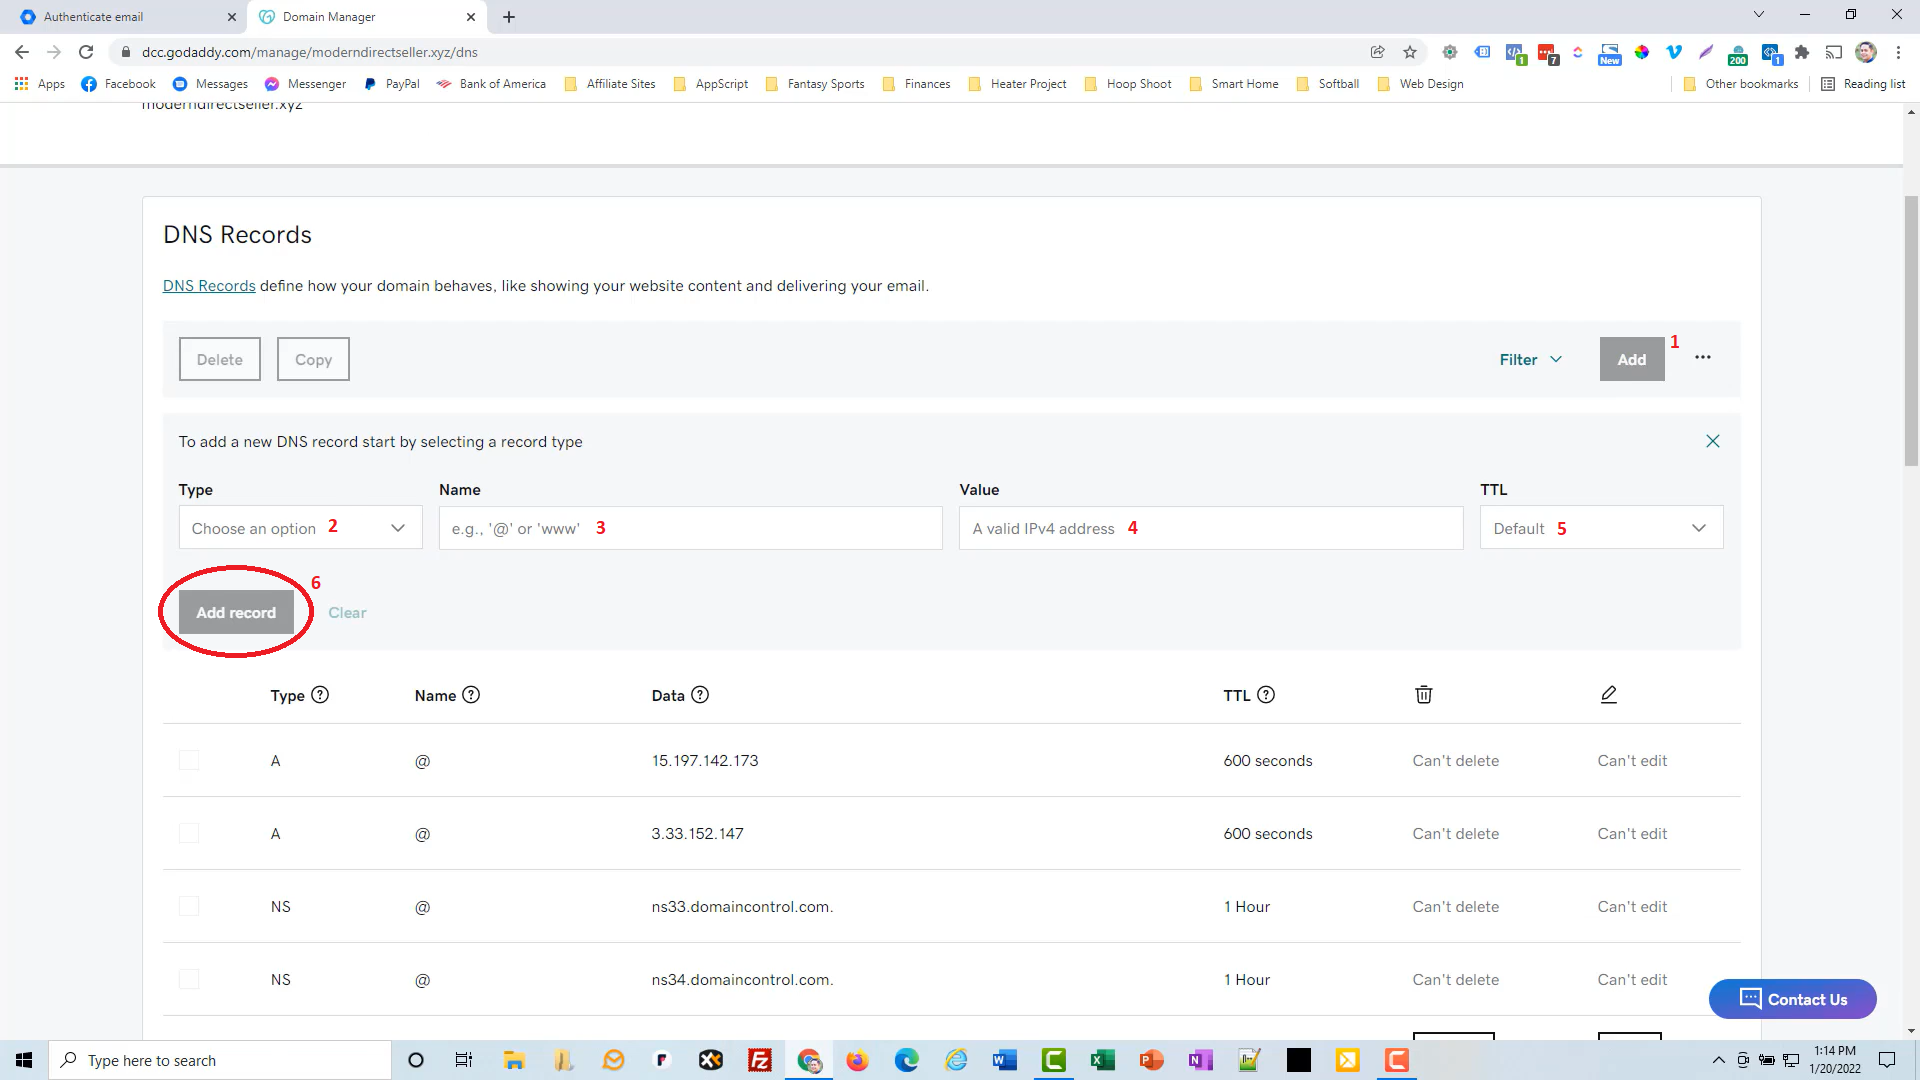
- Click the “ADD” button.
- For Type, select “TXT”
- For Name, copy and paste the “DNS Host name” from the key created in step 42.
- For Value, copy and paste the “TXT record value” from the key created in step 42.
- For TTL, leave it as “Default”
- Click the “ADD RECORD” button.
STEP 47 – Google Workspace: Authenticate Email
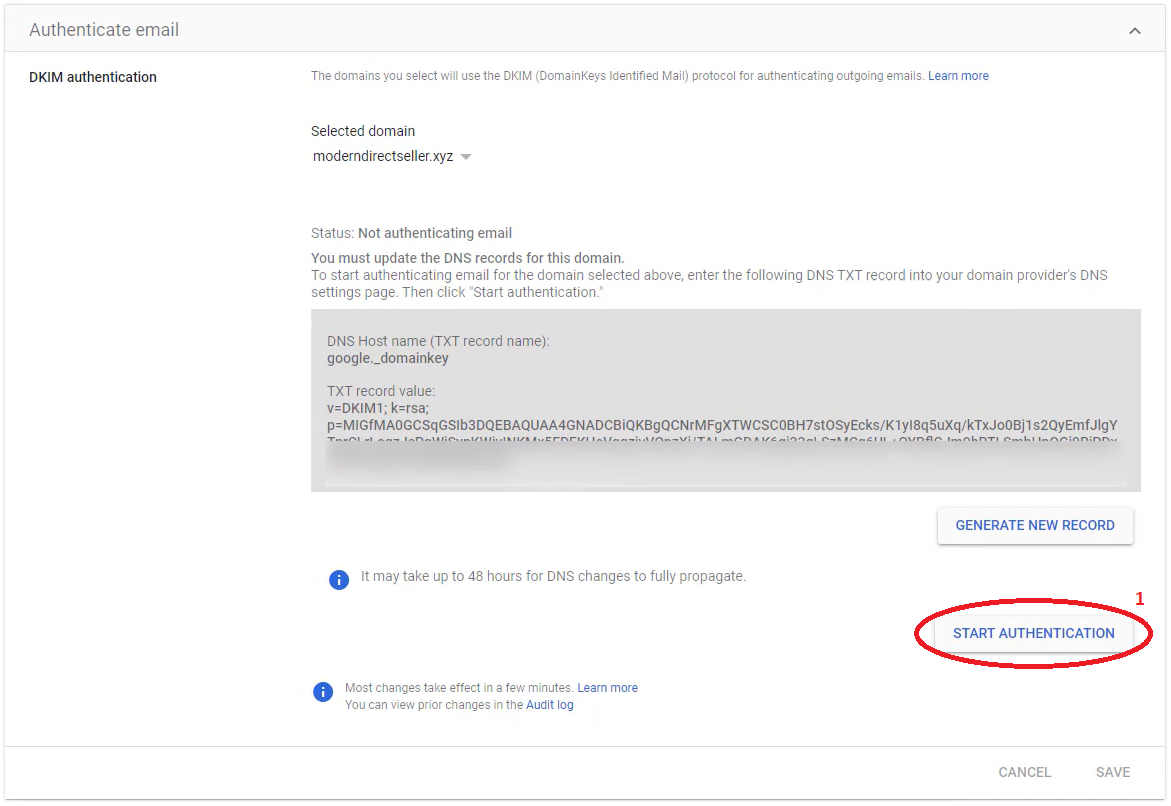
Head back over to your Google Workspace tab and click the “START AUTHENTICATION” button.
STEP 48 – Google Workspace: Check From Options
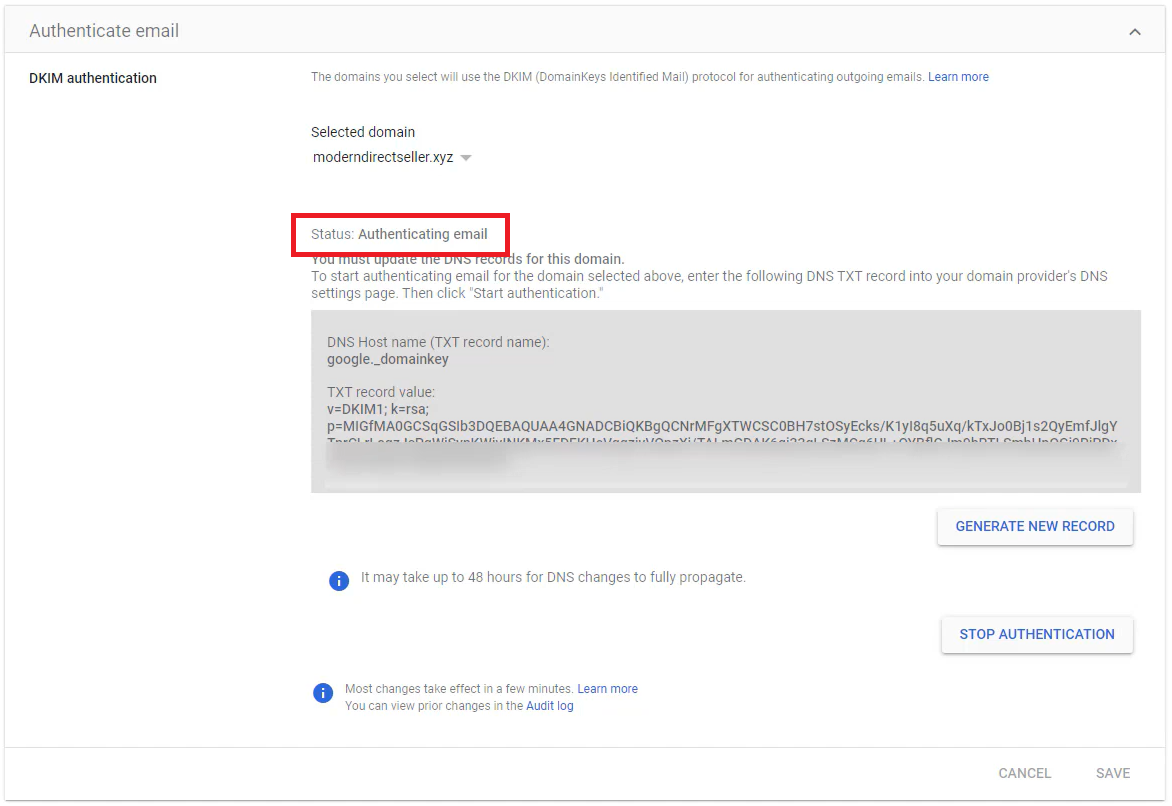
If everything was added correctly, you should see a “Status: Authenticating email” message. It may take a few minutes for Google to recognize the new key so if it fails the first time, try clicking the “START AUTHENTICATION” button again after a few minutes.
You’re All Done!!
Easy peasy right?? If you have any trouble getting it set up send us a message and we’ll be happy to help!


0 Comments